


 This topic is locked
[31/10/25] Mini Update (4.6b Comp cape + QoL)
- Xarpus Changes:
- Xarpus will now wait ~8 ticks before beginning his enrage phase attack where he turns to specific corners.
- Once he gets to 25% hp, he will screech, wait a few ticks, and begin turning towards corners to check.
- Xarpus will now wait ~8 ticks before beginning his enrage phase attack where he turns to specific corners.
- Hiscores changes:
- Solo group ironmen have been removed from the "Team Leaderboard" GIM ranking page, and you must now have at least 2 players in a team to be shown on the team leaderboard page.
- The "Individuals" page remains to view solo players.
- Solo group ironmen have been removed from the "Team Leaderboard" GIM ranking page, and you must now have at least 2 players in a team to be shown on the team leaderboard page.
- 4,600,000,000 Completionist Cape:
- Players who have reached the absolute highest amount of experience possible on a single account will now have the ability to transform their completionist monkey (g), or other completionist capes, into the new Completionist Cape (g) variant, to show off their immense dedication.
- https://imgur.com/rTI8hss[/size][/size]
- https://imgur.com/ZqqXWBJ[/size][/size]
- Quality of Life:
- Adjusted wilderness multi-lines so they are matched with OSRS.
- The hunting knife now uses the correct walk/run/attack animations.
- The drop rate of Giant keys from Obor/Hill giants has been increased drastically.
- The drop rate from hill giants is now 1/55 rather than 1/85.
- The drop rate from Obor is now 1/14 rather than 1/31.
- The drop rate of Mossy keys from moss giants and moss guardians has been increased drastically.
- The drop rate has changed from 1/85 to 1/55.
- Smelting bars will now give players a chance to get the Smithers pet.
- Realism/Elite/Group ironman players will now receive the full amount of gp from money caskets.
- Improved the timing of the Sol heredit beam attack so that damage from the second half will be delayed by an extra tick so that it visually aligns closer with the graphics.
- Bug Fixes:
- Fixed a bug where the Multi-lines plugin was not working properly.
- Realism players can now see items dropped by other realism players (or dropped from NPC's killed by realism players when they go public).
- Fixed a bug where right-clicking the edge of some data orbs would reset the minimap zoom level.
- Minor adjustments to hueycoatl timing/sounds.
- Fixed a bug where doom's acid spray was only happening in one direction.
- Fixed a bug where doom of mokhaiotl combat achievement speed times were being checked incorrectly.
- Fixed a bug where Mokhaiotl drift could only be completed at delve 8, not later.
- Fixed a bug with autocast spells not being selectable.
- Dooms tractor phase car slam will no longer destroy rocks if they are far away from players and doom itself.
- Since we extended the slam range further, this was causing the unintended side effect of destroying rocks that were far away after each slam which the player may have used later on during the attack.
- The ruby bolt (e) special effect will now show a hitsplat on the attacker to indicate how much health they lost.
- Players can now charge and dismantle the eye of ayak (uncharged) by right-clicking it.
- It can be dismantled into 10,000 demon tears.
- Fixed an issue with dragonbane weapons not working against some dragon types.
[23/10/25] Mini Update (Doom Combat Achievements, Fixes & more)
- Arclight/Darklight Changes:
- Players can now purchase the Darklight from the Loyalty points shop for 15,000 points.
- Players can now create the Arclight using 3 ancient shards.
- The Arclight can no longer be dismantled for 25 ancient shards.
- Due to the more common drop rate, and wanting to make the Arclight a more accessible weapon, we’ve removed this functionality.
- The arclight will now be dismantled for 3 ancient shards and the darklight.
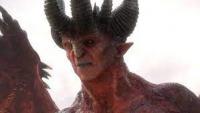
- Doom of Mokhaiotl Changes:
- Combat Achievements:
- 15 new combat achievements have been added for Doom of Mokhaiotl, ranging from Elite to Grandmaster.
- It will now be announced to the world whenever a player beats the deepest delve record.
- Adjusted doom sound effect timing.
- Sunfire splinters will no longer be announced when obtained from Doom of Mokhaiotl.
- Fixed a bug where the Eye of Ayak would not announce from Doom.
- Players who died during the fight with doom will no longer be able to claim their loot afterwards.
- Fixed an issue where the Doom of Mokhaiotl scoreboard would show total kills instead of deep delves for the personal statistics.
- If players have a charged eye of ayak while fighting the Doom of Mokhaiotl, it will now passively gain 10-20 charges per kill.
- The doom mound will now use the proper animation when appearing.
- The rocks that spawn when Doom burrows into it's tractor phase will now come a few ticks later and have the proper sounds.
- The runelite hiscores will now properly show the Doom of Mokhaiotl and Hueycoatl kill counts.
- Players will now have their stats/prayer/special attack restored when leaving the fight with Doom of Mokhaiotl.
- The Doom of Mokhaiotl pet will now show up in the All pets collection log entry.
- Doom will now attack players regardless of how far away they are (within the arena bounds).
- Fixed a bug where hitting doom too quickly during the charge punish attack would lead to 2 auto-attacks stacking on the same tick at higher delves.
- The volatile earth will now despawn when doom begins the slam attacks.
- The mound from the Doom of Mokhaiotl fight will no longer glow for Elite clue scrolls.
- Fixed a bug where doom would sometimes knock players back into a wall.
- Players will now be notified that the drop booster enhanced their loot at Doom of Mokhaiotl.
- Players will now be warned that they have rare loot to claim before descending to the next delve level when fighting doom.
- The loot tracker will now track doom of mokhaiotl loot.
- Players positions will no longer be reset when delving deeper if the arena does not change (delves 2 and 6).
- Doom will now spawn after 11 ticks rather than 6 when delving deeper.
- Players will now be notified how many deep delves they’ve done after each deep delve.
- Fixed an issue where the doom burrow hole would disappear after the fight in rare occasions.
- The acid spray from attacking now will now be in all 4 cardinal directions, rather than just 2.
- Combat Achievements:
- Bolt Pouch:
- Players can now purchase the bolt pouch from Sir Loyal T for 30,000 loyalty points.
- The bolt pouch is an item that cannot be equipped, but can store 10,000 of 3 different types of bolts within it.
- Most types of bolts are supported, with a few exceptions.
- The bolt pouch also gives players access to the extra ammunition slot (similar to the quiver) that can be used as long as they have a bolt pouch in their inventory.
- The functionality of this extra slot is exactly the same as the quiver, however the ammunition in the extra slot is separate from the quiver ammunition.
- Untradable Alchemy Warning:
- By right-clicking the high or low alchemy spell, and selecting the “Warnings” option, players can now toggle untradable warnings before alching untreatable items.
- Players will also be told that the item they are alching is untradable if they trigger the high-value warning.
- By right-clicking the high or low alchemy spell, and selecting the “Warnings” option, players can now toggle untradable warnings before alching untreatable items.
- Collection Log Overview:
- Players can now view the Collection log overview of another player.
- This can be done by first viewing the other player’s collection log (through right-clicking the collection log button), and then clicking on the hamburger menu in the top left and viewing the overview.
- Players can now view the Collection log overview of another player.
- Bug Fixes and Quality of Life:
- Fixed a bug where the Hueycoatl killcount for rare drops was always showing as 1.
- Fixed a bug where Hueycoatl was giving rare loot to multiple players instead of just one.
- Fixed a bug where players could not cast demonbane spells on demonic larva.
- Volatile earth should now last a few extra ticks.
- Fixed a bug where using magic spells against demonic larva would cause players to have unnecessarily long attack delays.
- Fixed an issue where the exploding rock projectiles had the incorrect graphics.
- The magic projectile was showing the range hit graphic and vice versa.
- Fixed a bug where Hueycoatl’s body parts would move around after being attacked.
- Players can now auto-cast ancient magic spells with the dragon hunter wand.
- Players can now install the Demonic larva/Larva tracker from the Plugin-hub.
- Players can now install the Attack-Timer plugin through the plugin-hub.
- Fixed a bug where Minimus would sometimes disapepar when entering a new Colosseum session.
- The infernal axe will no longer try to burn a log while cutting infected roots unless the player got a log.
- Fixed a bug where the Hueycoatl's stats were not showing up when looking up it's drops.
- Fixed a bug where 117 HD and the gpu plugin would not turn on automatically when the client started.
- Fixed an issue where some tiles in newer areas (doom/hueycoatl) were not properly rendering in LD mode.
- Fixed a bug with item sizes being a bit too large, and being cut off on the left side
- Also fixed an issue with the inventory tags plugin not highlighting items correctly.
- Fixed a bug where using a snowy knight mix (2) would result in the player obtaining an unusable item.
- Hueycoatl's killcount will now properly show up in the Collection log.
- Fixed a bug where crafting Hueycoatl hide required too high of a crafting level.
- Releasing snowy knights will now heal 15 hitpoints.
- Fixed a bug with the improved tile indicators plugin not working.
- Fixed a bug where Iban's blast would cause issues with setting auto-cast spells on the standard spellbook.
- Added more attack/defence sounds for the Hueycoatl fight.
- Fixed a bug where Hueycoatl’s range/magic attack graphic was not playing correctly.
- Fixed a bug where the red lava cape texture was not showing up properly on Alora’s HD.
- Fixed a bug where the Hosidius indoor floor texture was black on Alora’s HD.
- The base arclight drop rate from Skotizo is now about 4x more likely.
- Attack magic attack sounds to the Eye of ayak.
- Fixed a bug where right-clicking the minimap orbs would reset the minimap zoom levels.
- This will now only happen when right-clicking the minimap itself.
- Players can now right-click the fixed mode minimap to reset the zoom level.
- Thralls now have a 4-tick attack speed.
- Increased the Mokhaiotl cloth's visual value.
- This will be reflected in the loot interface when players obtain it.
- Fixed a bug where players could sometimes not reclaim their pets from Probita.
- Daily tasks will no longer be reset whenever the server is reset.
- The tasks and progress will now be saved when the server is reset, allowing players to pickup where they left off.
- Paladins now have a chance to give hard clues when pickpocketing.
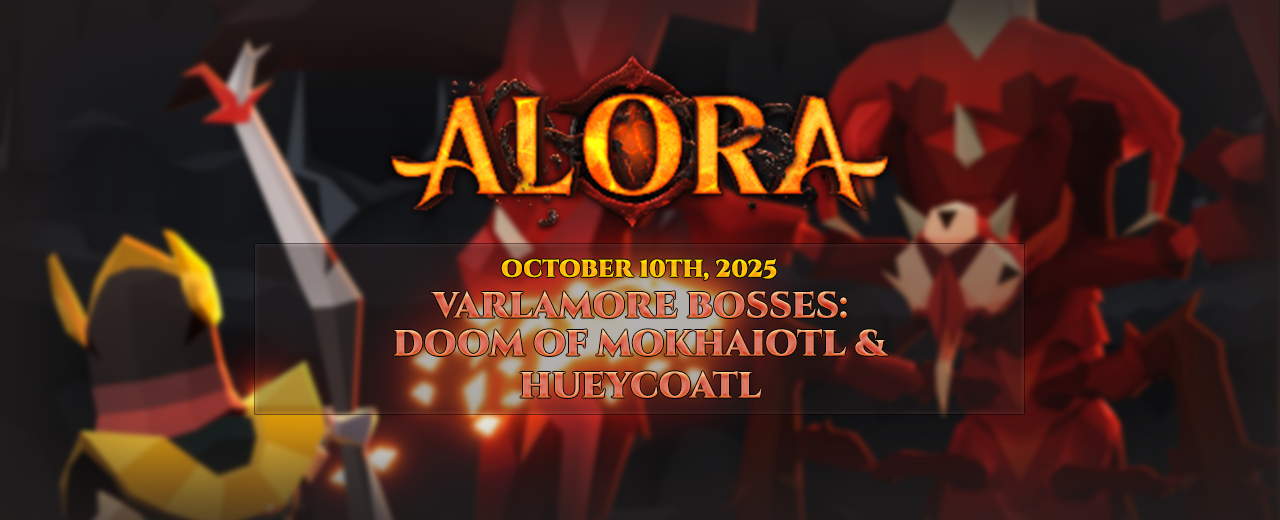
Hello everyone,
Today’s update continues with our expansion of Varlamore, this time bringing with it two all-new bosses for you to take on! The Doom of Mokhaiotl (Delve boss) is unique from other bosses by requiring you to continue pushing it further into its lair, with increasing difficulty (and rewards). Speaking of rewards, this boss introduces the Avernic treads (BIS boots for offensive/defensive bonuses), Eye of Ayak (one-handed staff, second most powerful in-game) and the Mokhaiotl cloth to create Confliction gauntlets (BIS mage gloves). Hueycoatl, on the other hand, can be fought alongside other players (up to 20 at once) and introduces the Tome of Earth, Dragon Hunter Wand (ideal against draconic creatures), Hueycoatl armor, and of course the Huberte pet.
On top of these new encounters and rewards, we’ve also made some other QoL changes and bug fixes as usual, we’ll let you have a look for yourself:
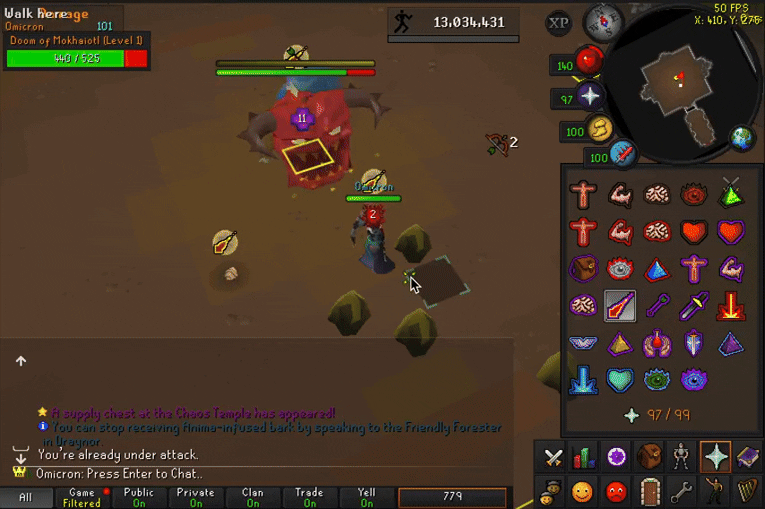
- Doom of Mokhaiotl:
- Players can now take on the Doom of Mokhaiotl in the Ruins of Mokhaiotl, accessed through the Tonali cavern.
- This is a delve boss with unique mechanics, requiring players to continuously defeat the boss and delve further into its lair, making the fight harder, but providing better loot at each delve.
- Each delve will slightly change/increase in difficulty until Delve 8.
- Players can delve to any depth, but all delves will effectively be the same difficulty as delve 8.
- After each delve level, players can choose to leave with their loot, or delve deeper, risking everything they’ve earned so far.
- Each delve will slightly change/increase in difficulty until Delve 8.
- The Fight:
- Doom has a few attacks that are present at all delve levels:
- Auto projectile attack:
- Doom will launch a red/blue/green projectile which requires the player to pray the against correctly to avoid being hit.
- Boulder Explosion attack:
- Doom will launch a blue or brown boulder at the player, which will explode, sending sharks at/around the player.
- A rock will appear on the shard that lands where the player was, blocking off that tile.
- Once the boulder explodes, the player will be hit with an auto attack projectile.
- Delve modifications:
- At higher delve levels, more auto-attack projectiles are sent, and at delve 8+, two boulders are sent at the player in quick succession.
- There is also a chance that Doom will begin charging its shield right after doing this attack.
- When it does this, it will protect from mage/range and begin charging a yellow bar above its head.
- If this bar is filled, the player will be hit for 60+ damage (99 at higher delves).
- The player must hit Doom with a melee attack.
- This attack has 100% accuracy, and will deal bonus damage based on the player’s strength bonus.
- When it does this, it will protect from mage/range and begin charging a yellow bar above its head.
- Doom will launch a blue or brown boulder at the player, which will explode, sending sharks at/around the player.
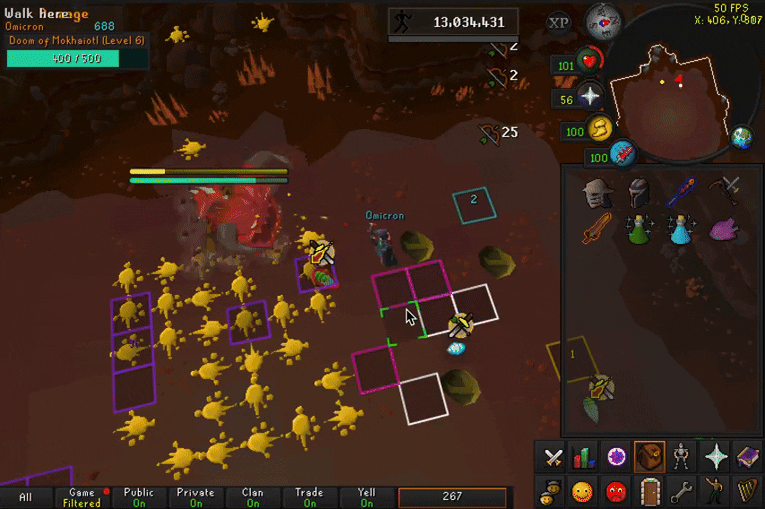
- Demonic Larva:
- Doom will occasionally spawn demonic larva nearby that will try to walk towards it.
- If the larva is allowed to reach doom, it will heal the boss and damage the player.
- The more larva are absorbed, the more the larva heal the boss/damage the player.
- This carries over between delves, and is not reset until the player leaves.
- The more larva are absorbed, the more the larva heal the boss/damage the player.
- Larva’s will protect 1-2 (depending on delve level) attack styles, and have 2 hitpoints.
- All non-demonbane weapons will deal 1 damage, while demonbane weapons will deal 2 damage.
- When the larva are killed, they will explode in a 3x3 area, damaging the player if they are nearby.
- This explosion can also damage doom, and the player will not take any damage if it does (even if they were within the 3x3 area).
- When the larva are killed, they will explode in a 3x3 area, damaging the player if they are nearby.
- All non-demonbane weapons will deal 1 damage, while demonbane weapons will deal 2 damage.
- If the larva is allowed to reach doom, it will heal the boss and damage the player.
- Doom will occasionally spawn demonic larva nearby that will try to walk towards it.
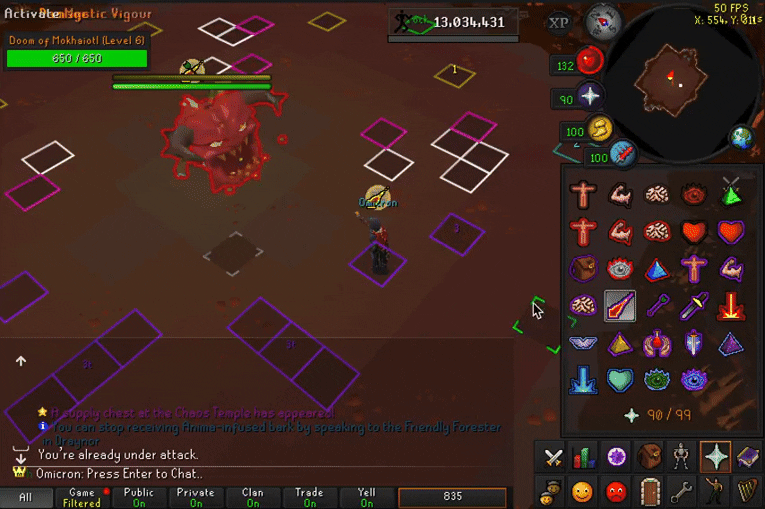
- Shield Charge:
- At delve level 3+, doom will begin to charge its shield again, and will be given a special over-shield with 500 hitpoints.
- Players must reset the yellow-bar progress by hitting doom occasionally.
- Allowing larva to explode and hit doom will deal 100 damage to this shield.
- Players must reset the yellow-bar progress by hitting doom occasionally.
- At delve level 3+, doom will begin to charge its shield again, and will be given a special over-shield with 500 hitpoints.
- Car Charge (delve 5+ only):
- Once the shield charge has been destroyed, doom will burrow into the ground and begin charging the player, hitting them if they are in the way, and destroying any rocks in its path.
- At higher delve levels, doom will also send out a shockwave after charging the player, which is only avoidable by hiding behind the rocks in the arena.
- Once the shield charge has been destroyed, doom will burrow into the ground and begin charging the player, hitting them if they are in the way, and destroying any rocks in its path.
- Shockwave:
- Volatile earth will spawn all over the arena, while doom prepares to send out multiple shockwaves.
- If the player hits 2 volatile earth before the shockwave begins, an earthen shield will spawn, protecting the player from the shockwaves if they are within it.
- The path the earthen shield takes is determined by the 2 volatile earths that were hit.
- The destination of the shield will be the first volatile earth that was hit, and the spawn point will be the last that was hit.
- The path the earthen shield takes is determined by the 2 volatile earths that were hit.
- If the player hits 2 volatile earth before the shockwave begins, an earthen shield will spawn, protecting the player from the shockwaves if they are within it.
- The amount of shockwaves sent out will depend on the delve level, having up to 5 shockwaves in a row at delve 8+.
- Volatile earth will spawn all over the arena, while doom prepares to send out multiple shockwaves.
- Acid blood:
- At delve level 3 and up, attacking doom will cause it to spray acid blood in a random cardinal direction.
- This blood stays on the ground between delves, and is only reset one time when the player enters delve level 6.
- Standing on the acid blood will inflict up to 7 venom damage per tick.
- At delve level 3 and up, attacking doom will cause it to spray acid blood in a random cardinal direction.
- Auto projectile attack:
- Doom has a few attacks that are present at all delve levels:
- This boss has many mechanics that constantly change throughout the fight and may take some getting used to, so we’re looking forward to seeing how deep you can delve.
- Scoreboard:
- There is a scoreboard near the entrance to the fight, which will track both personal and global statistics.
- The statistics tracked are total/personal deaths, total global/personal deep delves, deepest global/personal delve, and fastest global/personal delve 1-8 time.
- There is a scoreboard near the entrance to the fight, which will track both personal and global statistics.
- Unique Rewards:
- Avernic Treads:
- These are a new pair of boots that require level 80 defence, strength, ranged, and magic to wear.
- In their base form, they surpass the primordial/eternal/pegasian boots in most areas.
- Players can, however, use a combination of 4,000 demon tears, and the primordial/pegasian/eternal boots to upgrade the Avernic treads.
- Primordial boots:
- Adding these boots to the Avernic treads will provide +2 melee strength to the boots.
- Pegasian boots:
- Adding these boots to the Avernic treads will provide +1 ranged strength.
- Eternal boots:
- Adding these boots to the Avernic treads will provide +1% magic damage.
- There are 8 variants of the Avernic treads in total (including the base form).
- Upgrading the boots will require 80 Magic and Runecrafting to do.
- Primordial boots:
- Players can, however, use a combination of 4,000 demon tears, and the primordial/pegasian/eternal boots to upgrade the Avernic treads.
- In their base form, they surpass the primordial/eternal/pegasian boots in most areas.
- These are a new pair of boots that require level 80 defence, strength, ranged, and magic to wear.
- Eye of Ayak:
- This is a one-handed powered staff that requires level 83 magic to wield.
- It has a built-in spell that can be charged using either demon tears (1 tear per cast), or runes (2 death runes and 1 chaos rune per cast).
- When charging the eye, only runes or tears can be used, they cannot be combined.
- The eye of Ayak has a 3-tick attack speed.
- It also has a special attack which consumes 50% of the player’s special attack energy, doubling the player’s accuracy and increasing their max hit by 30%.
- It will drain the target’s magic defence equal to the damage dealt.
- It has a built-in spell that can be charged using either demon tears (1 tear per cast), or runes (2 death runes and 1 chaos rune per cast).
- This is a one-handed powered staff that requires level 83 magic to wield.
- Mokhaiotl cloth:
- This cloth can be used alongside 10,000 demon tears to upgrade the tormented bracelet into the Confliction Gauntlets, a new best-in-slot pair of mage gloves.
- This requires level 83 crafting and 70 smithing, and provides 500 base crafting experience and 100 base smithing experience.
- This cloth can be used alongside 10,000 demon tears to upgrade the tormented bracelet into the Confliction Gauntlets, a new best-in-slot pair of mage gloves.
- Avernic Treads:
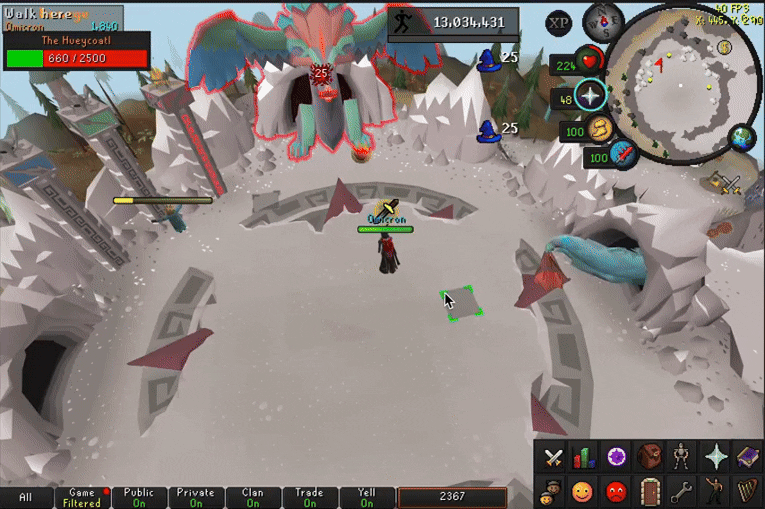
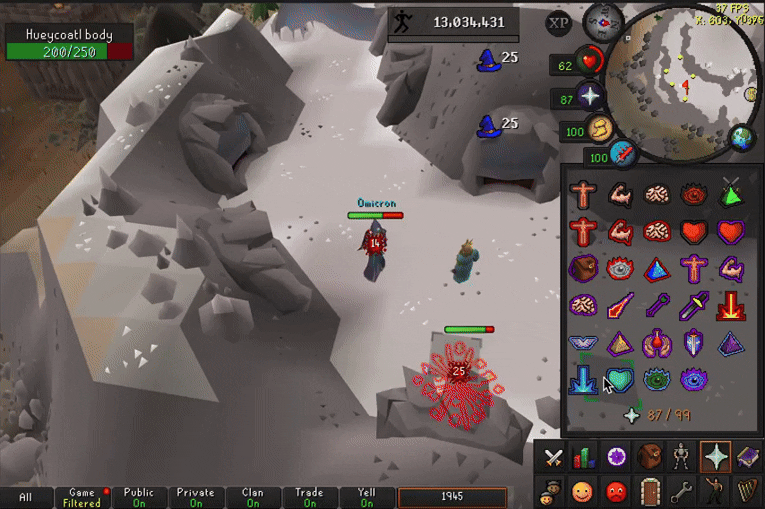
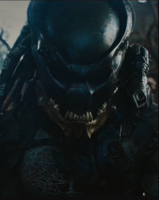
- Hueycoatl:
- Players can now challenge the Hueycoatl at the Darkfrost.
- Players can fight the Hueycoatl in the main instance or in their own private instances.
- Each instance can hold up to 20 players at once.
- Private instances cost 100,000 coins to create, and can be done so at the flag near the entrance.
- Each instance can hold up to 20 players at once.
- The Fight:
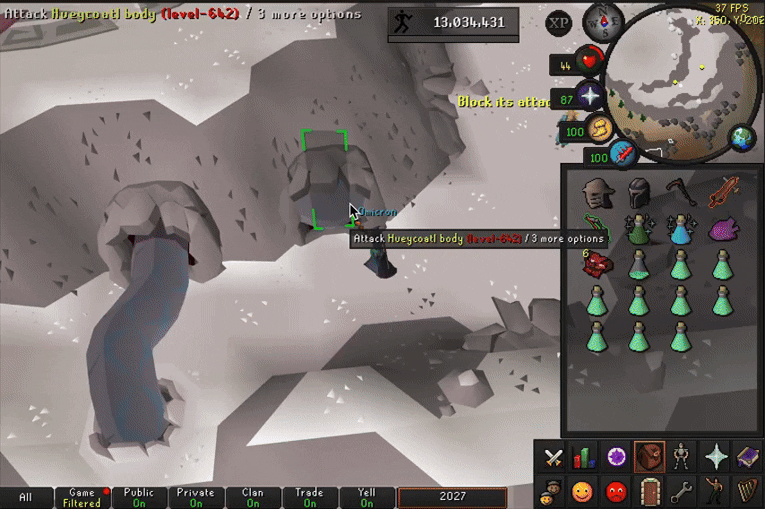
- Upon entering the arena, players will need to kill the exposed segments of the Hueycoatl’s body at the base of the mountain.
- During this time, they will be targeted by a few different attacks, some that must be prayed against, and some that must be dodged.
- Once players have defeated all of the body parts, Hueycoatl’s tail will move out of the way, allowing players to run to the top of the mountain to confront the Hueycoatl.
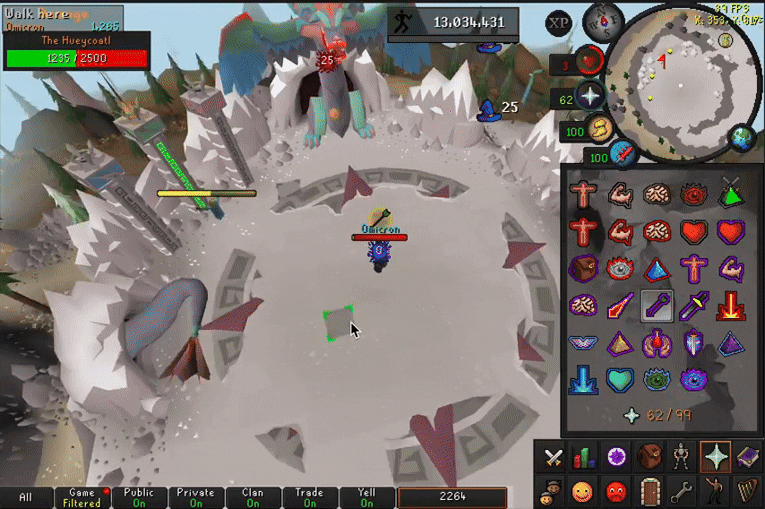
- At this point, players must attack the Hueycoatl’s main body.
- During this part of the fight, there will be 3 main stages:
- The first stage will involve attacking the Hueycoatl while avoiding the same attacks as the first part of the fight.
- Once it reaches half health, the Hueycoatl will shield itself, and players must attack the tail.
- The tail can only take 4-9 damage per attack (the damage is better if the player’s crush attack bonus is their highest).
- The tail will regularly inflict a shockwave attack that can deal up to 25 damage if not evaded.
- After the tail has been defeated, the Hueycoatl will become enraged, causing it to attack faster, and occasionally send out shockwaves.
- During this part of the fight, there will be 3 main stages:
- Throughout the fight, players can coordinate their prayers to allow the Seer to light up the braziers.
- If all Braziers are fully lit when the bar is full, they will obtain a 30% damage bonus until the bar fills up again.
- Players must balance the number of prayers based on the number of players in the team.
- There must be at least 3 players in the fight to activate this bonus.
- For example, if there are 3 players, one must pray range, one must pray magic, and one must pray melee to properly fill up all three braziers.
- There must be at least 3 players in the fight to activate this bonus.
- At this point, players must attack the Hueycoatl’s main body.
- Once the Hueycoatl is defeated, any player who dealt at least 75 damage to the head/tail will receive rewards.
- The more a player contributing to the fight, the more rewards they will get.
- The player who deals the most damage is the MVP, and will receive a 10% increase to their drop share.
- Upon entering the arena, players will need to kill the exposed segments of the Hueycoatl’s body at the base of the mountain.
- Combat Achievements:
- Hueycoatl has 11 new Combat achievements that range from Medium->Grandmaster in difficulty.
- Unique Rewards:
- Tome of Earth:
- The tome of earth is a book requiring 50 magic to wield.
- This is similar to other elemental tomes, requiring soiled pages to charge.
- The charging system is identical to the other tomes, each page gives 50 charges, and 250 pages will permanently charge the tome.
- The charged tome increases earth spell damage by 10%, and provides unlimited earth runes.
- Players can trade in extra tomes of fire to the Seer for 250 soiled pages.
- This is similar to other elemental tomes, requiring soiled pages to charge.
- The tome of earth is a book requiring 50 magic to wield.
- Dragon Hunter Wand:
- This is a dragonbane wand requiring level 65 magic to wield. The wand increases accuracy by 75% and damage by 40% when fighting draconic creatures.
- Hueycoatl Hide:
- 3 hides drop from Hueycoatl at a time.
- These hides can be used to create Hueycoatl hide armour.
- This can be done with a needle and thread.
- Hueycoatl hide body:
- Requires 3 Hueycoatl hides, level 78 crafting, and provides 286 base crafting experience.
- Hueycoatl hide chaps:
- Requires 2 Hueycoatl hides, level 77 crafting, and provides 190 base crafting experience.
- Hueycoatl hide coif:
- Requires 2 Hueycoatl hides, level 76 crafting, and provides 190 base crafting experience.
- Hueycoatl hide vambraces:
- Requires 1 Hueycoatl hide, level 76 crafting, and provides 95 base crafting experience.
- Hueycoatl hide armour requires level 70 ranged and level 40 defence to equip.
- The armour is an upgrade over blessed dragon hide armour, improving prayer and magic defence bonuses.
- Soiled Pages:
- These pages are used to charge the Tome of Earth.
- Huberte pet
- Tome of Earth:
- Players can fight the Hueycoatl in the main instance or in their own private instances.
- Players can now challenge the Hueycoatl at the Darkfrost.
- Autocast Changes:
- Auto-cast spells will now persist on logout.
- This means that if you were previously auto-casting Earth wave, for example, and log off, then the next time you login, the game will remember you were casing earth wave, and automatically set your autocast spell.
- Autocast spells are now spellbook-based, rather than staff-based.
- Previously, the game would only remember and automatically set your autocast spell for one particular staff.
- It will now set your autocast spell (whenever possible) regardless of what staff you equip.
- For example, if you set your ancient magicks autocast spell to ice barrage while using an ancient staff, and then switch to a Kodai wand, it will keep your currently set autocast spell as Ice barrage.
- Previously this would force you to set your autocast spell again.
- This will not work if your staff cannot cast a spell from that spellbook.
- For example, if you set your ancient magicks autocast spell to ice barrage while using an ancient staff, and then switch to a Kodai wand, it will keep your currently set autocast spell as Ice barrage.
- It will now set your autocast spell (whenever possible) regardless of what staff you equip.
- Players can still reset their saved auto-cast by clicking the “cancel” option in the autocast interface.
- Previously, the game would only remember and automatically set your autocast spell for one particular staff.
- As always, autocast spells will not be remembered or automatically set if a player has been in PvP within the last minute.
- Players who are in PvP situations will still need to either manually cast, or set their autocast spells each time they change weapons or spell books.
- Auto-cast spells will now persist on logout.
- Oran’s Ores Changes:
- The cost of all ores has been greatly reduced, and is now 1.5x the high alchemy value of the ore.
- Ironmen can now sell ores to back to Ordan.
- This will be at 40% of the purchase cost.
- The sell price will also not change regardless of the quantity in the shop.
- Players can now sell noted items to Orand’s Ores if the un-noted item is already sold by him.
- This allows players to sell their noted ores to Ordan.
- Normal/Realism/Classic players will now be able to purchase ores from Ordan’s supplies.
- Stackable Master Clue Scrolls:
- Master clue scrolls are now fully stackable, similar to all other clue difficulties.
- Players will receive master scroll boxes when they obtain a master clue scroll from drops, opening caskets, and Watson.
- Master clue scrolls are now fully stackable, similar to all other clue difficulties.
- Vale Offerings Vote Bonus:
- Players can now select an option for 15% bonus vale offerings from the vote book bonuses.
- This will apply when the ent’s visit the totem sites, not when the offerings are collected.
- Because players can only get 2-6 vale offerings from the ent visits, they will have a chance to get an extra offering when an ent visits, which increases based on the number of vale offerings they will receive.
- This will apply when the ent’s visit the totem sites, not when the offerings are collected.
- Players can now select an option for 15% bonus vale offerings from the vote book bonuses.
- Quality of Life:
- The Gauntlet chest will now display a loot interface similar to the Barrows chest interface.
- This is just to clearly show the loot that was obtained.
- Items will be au
- This is just to clearly show the loot that was obtained.
- Players can no longer get duplicate amulets of the eye from intricate pouches.
- The magic spell hit sounds will now play on the same tick the hitsplat appears.
- Added spawn sound effects for thralls.
- Added some more yama sound effects to the fight.
- Added judge of yama combat sounds.
- Adjusted the attack and bounce sounds of the Venator bow.
- Adjusted some muspah sounds/graphics.
- Players can now kill Bryophyta growthlings by having an axe or secateurs equipped.
- Previously, players would need to use an axe/secateurs on the growthling when it was weak.
- Mixology will now reward 20% more resin when fulfilling orders.
- The cost of extracts from the Ventriculus has been reduced from by 33%.
- Zalcano loot mechanics change:
- Previously, you simply needed to hit Zalcano for 100 damage to be eligible for loot.
- We’ve updated it to match OSRS, with 5 damage being required to be eligible for loot, and 31 damage required to be eligible for uniques / pet.
- The Gauntlet chest will now display a loot interface similar to the Barrows chest interface.
- Bug Fixes:
- Fixed the venator bow secondary projectile graphic id.
- Fixed a bug where burnt fish count towards daily achievements.
- The dragon felling axe can now be used in the Enchanted valley stamp clue scroll step.
- The bone squirrel/hell cat ears now have bank placeholders.
- Fixed an issue where the Bees in the Colosseum would cause Mobs to stack.
- Fixed a bug where bloat's falling hands would sometimes be invisible.
- Fixed a bug where Spindel's spiderlings would stop players from attacking Spindel until they were killed.
- The venator bow will no longer target inferno pillars.
- Fixed a bug where Eternal donators could only prep for 4 kills at duke rather than 20.
- Colosseum combat achievements will now be completed when Sol heredit dies, rather than when the player leaves.
- Fixed a bug with the fangs of venenatis not being noteable.
- Fixed a bug where players could not buy items from Worm tongue's shop.
- Adjusted the un-noted item value of dynamite.
- Fixed a bug where secondary weapon attack (dragon claw spec, scythe of vitur, etc...) follow up hits would be protected against by the Judge of Yama.

As always, with updates this large there are bound to be a few bugs — please report them as soon as possible using the bug report section on the forums so that we may patch them up as quickly as possible!
Regards,
Omicron


 Im soo excited to learn how to fight the both of them!!
  This is such an exciting update!!
  Thank you Omicron!!!